Rust support in Emacs improved a lot during the past two years. This post will walk you through setting up Emacs to allow for:
- Navigating the source code (go to to implementation, list references, outline module structure)
- Code completion
- Code snippets
- Highlighting errors and warnings inline
- Apply code fixes and refactorings
- Automatically import definitions if necessary (such as for Traits)
- Code formatting with rustfmt
- Building & running other cargo commands
This setup will be based on rust-analyzer, a LSP server that is under very active development and powers the Rust support in VS Code as well.
This post is accompanied by a github repository that you can use as a reference or directly checkout and run Emacs with (see below). I’ve tested the configuration with Emacs 28.2, rust stable 1.66.0 and on macOS 13.1, Ubuntu 22.04 and Windows 10.
For a setup that uses the emacs-racer backend1 please see David Crook’s guide.
Table of Contents
Changelog
Changes made to this guide:
- 2023-07-23:
lsp-rust-analyzer-server-display-inlay-hintswas removed, uselsp-inlay-hint-enableinstead (thank you Wojciech!) - 2023-02-22: Inlay hints work well again (https://github.com/emacs-lsp/lsp-mode/issues/3896)
- 2023-01-10: Currently inlay hints on rust-analyzer versions newer than 2022-12-19 won’t work
- 2022-09-13: Use
lsp-format-bufferinstead ofrustic-format-on-save - 2022-06-19: Note about potential
LSP :: rust-analyzer failed to discover workspaceerror (thanks Fred Xia!) - 2022-03-26: Clarified that rustic derives from rust-mode
- 2022-03-24: Inlay hints fixed & more inlay hints available
- 2022-03-14: Note about broken lsp-lens-mode / inlay hints
- 2021-11-28: Note about rust-playground
- 2021-11-15: rust-analyzer installation / compatibility note
- 2021-06-17: fix for buffer-save-without-query
- 2021-03-06: add
lsp-rust-analyzer-server-display-inlay-hints - 2021-02-08: Add dap debugging setup
Quickstart
If you have already Rust and Emacs installed (see prerequisites) you can get quickly up and running without modifying any of your existing configuration. The rksm/emacs-rust-config github repo contains a standalone.el file that you can use to start Emacs with:
$ git clone https://github.com/rksm/emacs-rust-config
$ emacs -q --load ./emacs-rust-config/standalone.el
This will start Emacs with an .emacs.d directory set to the location of the checked out repository (and a different elpa directory). This means, it will not use or modify your $HOME/.emacs.d. If you are unsure if you are happy with what is described here, this is an easy way to figure it out.
All dependencies will be installed on first startup, this means the first start will take a few seconds.
On windows you can use a shortcut to start Emacs with those parameters. If you are on macOS and have installed the Emacs.app you will need to start Emacs from the command line with:
/Applications//Emacs.app/Contents/MacOS/Emacs -q --load ./emacs-rust-config/standalone.el
Prerequisites
Before we get to the actual Emacs configuration, please make sure your system is setup with the following.
Rust
Install the rust toolchain with cargo. rustup makes that easy. Install rust stable and make sure that the .cargo/bin directory is in your PATH. rustup will do this by default. rust-analyzer will also need the Rust source code and you can install that with rustup component add rust-src.
rust-analyzer
You need the rust-analyzer server binary. You can install it following the rust analyzer manual, pre-compiled binaries are available. However, since rust-analyzer is so actively developed I usually just clone the github repository and build the binary myself. This makes upgrading (and downgrading should it be necessary) very straightforward.
$ git clone https://github.com/rust-analyzer/rust-analyzer.git -b release
$ cd rust-analyzer
$ cargo xtask install --server # will install rust-analyzer into $HOME/.cargo/bin
I’ve heard that (very) occasionally the most recent version might not work. In that case I can recommend to take a look at the rust-analyzer changelog which contains links to a git commit for each weeks update. In case you run into trouble, build from an earlier version, which will likely succeed.
Please also make sure that your emacs packages are up-to-date, in particular lsp-mode and rustic-mode to ensure that the newest rust-analyzer features are supported.
If you need to run with an older version of rust-analyzer you can look for an older release tag with git tag and then build against it like:
git checkout 2022-12-19
cargo xtask install --server
This should work with older versions of the relevant emacs packages as well.
Emacs
I have tested the setup with Emacs 28.2. On macOS I normally use emacsformacosx.com. On Windows I use the “nearby GNU mirror” link at gnu.org/software/emacs. On Ubuntu adding another apt repository is necessary. Note that the config will likely work with older Emacs versions but Emacs 27 got substantial improvements around JSON parsing which speeds up LSP clients quite a bit.
Note that I use use-package for Emacs package management. It will be auto-installed in the standalone version of this config. Otherwise you can add a snippet like below to your init.el:
(unless (package-installed-p 'use-package)
  (package-refresh-contents)
  (package-install 'use-package))
Rust Emacs Configuration in Detail
The essential modes being used are the following:
- rustic
- lsp-mode
- company
- yasnippet
- flycheck
Rustic
rustic is an extension of rust-mode which adds a number of useful features (see the its github readme) to it. It is the core of the setup and you can use just it without any other Emacs packages (and without rust-analyzer) if you just want code highlighting, compilation and cargo commands bound to emacs shortcuts, and a few other features.
(use-package rustic
  :ensure
  :bind (:map rustic-mode-map
              ("M-j" . lsp-ui-imenu)
              ("M-?" . lsp-find-references)
              ("C-c C-c l" . flycheck-list-errors)
              ("C-c C-c a" . lsp-execute-code-action)
              ("C-c C-c r" . lsp-rename)
              ("C-c C-c q" . lsp-workspace-restart)
              ("C-c C-c Q" . lsp-workspace-shutdown)
              ("C-c C-c s" . lsp-rust-analyzer-status))
  :config
  ;; uncomment for less flashiness
  ;; (setq lsp-eldoc-hook nil)
  ;; (setq lsp-enable-symbol-highlighting nil)
  ;; (setq lsp-signature-auto-activate nil)

  ;; comment to disable rustfmt on save
  (setq rustic-format-on-save t)
  (add-hook 'rustic-mode-hook 'rk/rustic-mode-hook))

(defun rk/rustic-mode-hook ()
  ;; so that run C-c C-c C-r works without having to confirm, but don't try to
  ;; save rust buffers that are not file visiting. Once
  ;; https://github.com/brotzeit/rustic/issues/253 has been resolved this should
  ;; no longer be necessary.
  (when buffer-file-name
    (setq-local buffer-save-without-query t))
  (add-hook 'before-save-hook 'lsp-format-buffer nil t))
Most of rustics features are bound to the C-c C-c prefix (that is press Control-c twice and then another key):
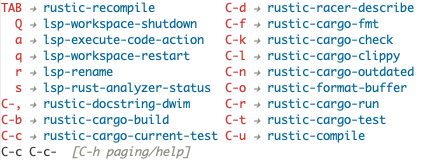
You can use C-c C-c C-r to run the program via cargo run. You will be asked for parameters and can for example specify --release to run in release mode or --bin other-bin to run the target named “other-bin” (instead of main.rs). To pass parameters to the executable itself use -- --arg1 --arg2.
The shortcut C-c C-c C-c will run the test at point. Very handy to run inline tests and to not always have switch back-and-forth between a terminal and Emacs.
C-c C-p opens a popup buffer that will give you similar access to the commands shown above but will stick around.
Rustic provides even more helpful integration with cargo, e.g. M-x rustic-cargo-add will allow you to add dependencies to your projects Cargo.toml (via cargo-edit that will be installed on demand).
If you would like to share a code snippet with others, M-x rustic-playpen will open your current buffer in https://play.rust-lang.org where you can run the Rust code online and get a shareable link.
Code formatting on save is enabled and will use rustfmt. To disable it set (setq rustic-format-on-save nil). You can still format a buffer on demand using C-c C-c C-o.
lsp-mode and lsp-ui-mode
lsp-mode provides the integration with rust-analyzer. It enables the IDE features such as navigating through source code, highlighting errors via flycheck (see below) and provides the auto-completion source for company (also below).
(use-package lsp-mode
  :ensure
  :commands lsp
  :custom
  ;; what to use when checking on-save. "check" is default, I prefer clippy
  (lsp-rust-analyzer-cargo-watch-command "clippy")
  (lsp-eldoc-render-all t)
  (lsp-idle-delay 0.6)
  ;; enable / disable the hints as you prefer:
  (lsp-inlay-hint-enable t)
  ;; These are optional configurations. See https://emacs-lsp.github.io/lsp-mode/page/lsp-rust-analyzer/#lsp-rust-analyzer-display-chaining-hints for a full list
  (lsp-rust-analyzer-display-lifetime-elision-hints-enable "skip_trivial")
  (lsp-rust-analyzer-display-chaining-hints t)
  (lsp-rust-analyzer-display-lifetime-elision-hints-use-parameter-names nil)
  (lsp-rust-analyzer-display-closure-return-type-hints t)
  (lsp-rust-analyzer-display-parameter-hints nil)
  (lsp-rust-analyzer-display-reborrow-hints nil)
  :config
  (add-hook 'lsp-mode-hook 'lsp-ui-mode))

(use-package lsp-ui
  :ensure
  :commands lsp-ui-mode
  :custom
  (lsp-ui-peek-always-show t)
  (lsp-ui-sideline-show-hover t)
  (lsp-ui-doc-enable nil))
lsp-ui is optional. It provides inline overlays over the symbol at point and enables code fixes at point. If you find it to flashy and prefer not activating it just remove :config (add-hook 'lsp-mode-hook 'lsp-ui-mode).
The config shown above already disables the documentation normally shown inline by lsp-ui. This is too much for my taste as it often covers up source code. If you want to also deactivate the documentation shown in the minibuffer you can add (setq lsp-eldoc-hook nil). To do less when your cursor moves consider (setq lsp-signature-auto-activate nil) and (setq lsp-enable-symbol-highlighting nil).
lsp-mode will try to figure out the project directory that rust-analyzer should use to index the project. When you first open a file inside a new project, you will be asked which directory to import:

The first selection (press i) will use the directory in which a Cargo.toml file was found, potentially the workspace root if the crate you work on is inside a workspace. The second selection (I) will allow you to select the root project directory manually. The last selection (n) will prevent lsp from starting. Sometimes when you follow a reference to a library crate it can be useful to not enable lsp for it as the lsp startup and indexing well take some time for large code bases.
lsp-mode remembers the choice for the project directory so the next time you open a file of a known project you do not need to make that selection again. If you ever want that, you can invoke the lsp-workspace-folders-remove command to interactively remove directories from the list of known projects.
Should you ever see an error such as LSP :: rust-analyzer failed to discover workspace when trying to open a .rs file, try invoking the lsp-workspace-folders-add manually and add the root project directory.
Code navigation
Having setup lsp-mode, you can use M-. to jump to the definition of function, structs, packages etc. when your cursor is over a symbol. M-, to jump back. With M-? you can list all references of a symbol. A little demo:
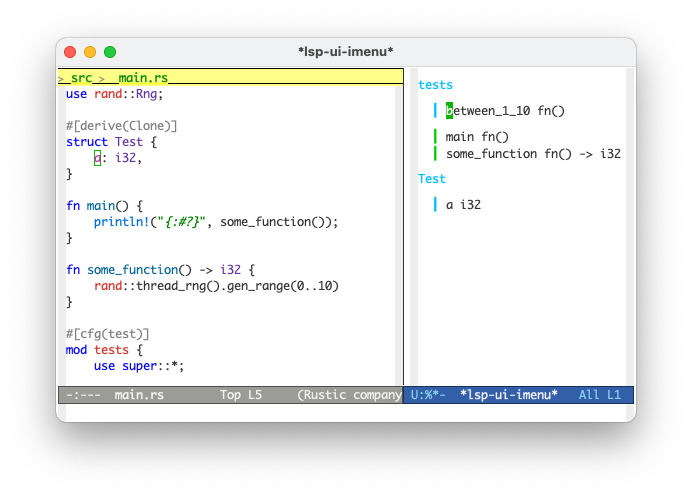
With M-j you can open up an outline of the current module that allows you to quickly navigate between functions and other definitions.
Code actions
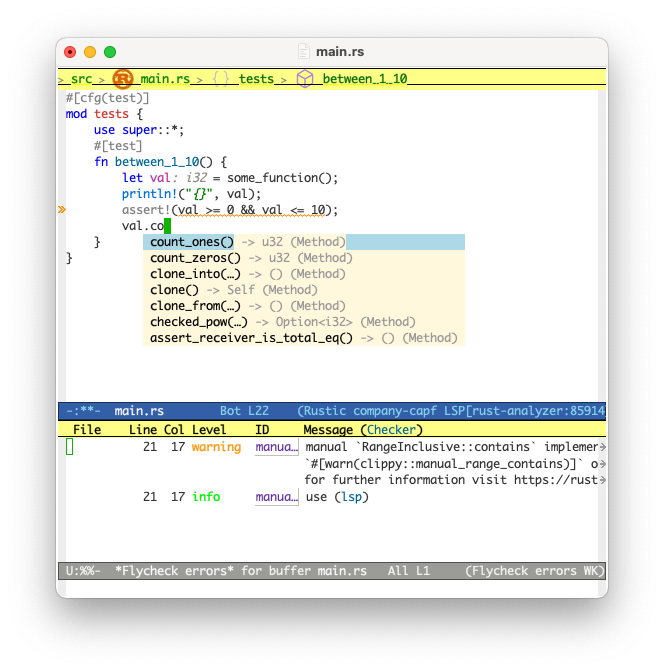
Refactorings are possible using M-x lsp-rename and lsp-execute-code-action. Code actions are basically code transformation and fixes. For example the linter may find a way to express code more idiomatically:
The number of available code actions continuously growth. A full list is available in the rust-analyzer documentation. Favorites include automatically importing functions or fully qualifying symbols. E.g. in a module that does not yet use HashMap, type HashMap and then select the option to Import std::collections::HashMap. Other code actions allow you to add all possible arms in a match expression or converting a #[derive(Trait)] into the code needed for a custom implementation. And many, many more.
If you developing macros, quickly seeing how they expand can be really useful. Use M-x lsp-rust-analyzer-expand-macro or the shortcut C-c C-c e to macroexpand.
Code completion and snippets
lsp-mode directly integrates with company-mode, a completion framework for emacs. It will display a list of possible symbols that could be inserted at the cursor. It is very helpful when working with unknown libraries (or the std lib) and reduces the need for looking up documentation. Rust’s type system is used as a source for the completions and thus what you can insert makes (mostly) sense.
By default the code completion popup will appear after company-idle-delay which is set to 0.5 seconds by default. You can modify that value or disable the auto popup completely by setting company-begin-commands to nil.
(use-package company
  :ensure
  :custom
  (company-idle-delay 0.5) ;; how long to wait until popup
  ;; (company-begin-commands nil) ;; uncomment to disable popup
  :bind
  (:map company-active-map
	      ("C-n". company-select-next)
	      ("C-p". company-select-previous)
	      ("M-<". company-select-first)
	      ("M->". company-select-last)))

(use-package yasnippet
  :ensure
  :config
  (yas-reload-all)
  (add-hook 'prog-mode-hook 'yas-minor-mode)
  (add-hook 'text-mode-hook 'yas-minor-mode))
This will also enable code snippets via yasnippet. I have added the list of my most commonly used snippets to the github repository. Feel free to copy and modify them. They work by typing a certain character sequence and then pressing TAB. For example for<TAB> will expand into a for loop. You can customize what is being pre-filled and the number of stops while expanding and even run custom elisp code. See the yasnippet documentation.
To enable snippet expansion, code completion and indentation when you press the TAB key, we need to customize the command that is running when pressing TAB:
(use-package company
  ;; ... see above ...
  (:map company-mode-map
	("<tab>". tab-indent-or-complete)
	("TAB". tab-indent-or-complete)))

(defun company-yasnippet-or-completion ()
  (interactive)
  (or (do-yas-expand)
      (company-complete-common)))

(defun check-expansion ()
  (save-excursion
    (if (looking-at "\\_>") t
      (backward-char 1)
      (if (looking-at "\\.") t
        (backward-char 1)
        (if (looking-at "::") t nil)))))

(defun do-yas-expand ()
  (let ((yas/fallback-behavior 'return-nil))
    (yas/expand)))

(defun tab-indent-or-complete ()
  (interactive)
  (if (minibufferp)
      (minibuffer-complete)
    (if (or (not yas/minor-mode)
            (null (do-yas-expand)))
        (if (check-expansion)
            (company-complete-common)
          (indent-for-tab-command)))))
My most commonly used snippets are for, log, ifl, match and fn.
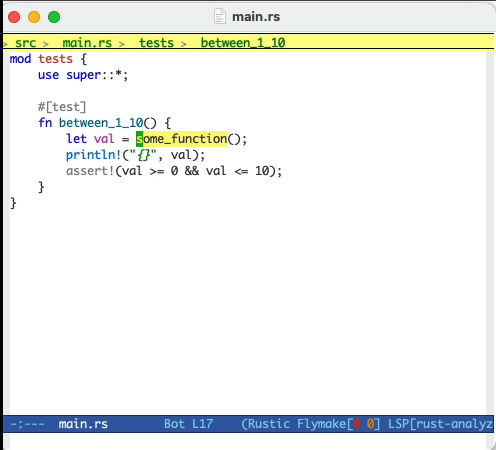
Inline errors
That one is easy, rustic does the heavy lifting. We just need to make sure flycheck is being loaded:
(use-package flycheck :ensure)
You can display a list of errors and warnings using M-x flycheck-list-errors or by pressing C-c C-c l.
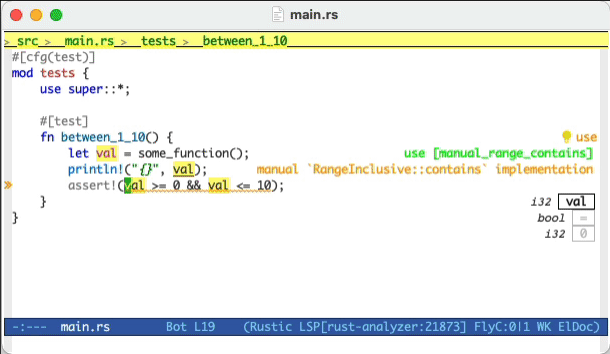
Inline type hints
Rust-analyzer and lsp-mode are able to show inline type annotations. Normally, those would appear via eldoc when placing the cursor over the defined variable, with the annotations you will always see the inferred types. Use (setq lsp-inlay-hint-enable t) to enable them2. To actually insert an inferred type into the source code you can move your cursor over the defined variable and run M-x lsp-execute-code-action or C-c C-c a.
Note that they might not interact well with lsp-ui-sideline-mode. If you prefer the hints but want to disable sideline mode, you can add (lsp-ui-sideline-enable nil) to a rustic-mode-hook.
As of the rust-analyzer and lsp-mode versions of 2022-03-24 there are even more kinds of inline hints available which now include lifetime hints, intermediate types in method chains and more!
Debugging
Emacs integrates with gdb and lldb via the dap-mode package3. In order to setup debugging support for Rust, you will need to do some additional setup and build steps. In particular, you will need to have lldb-mi which is not part of the official llvm distribution that Apple provides via XCode.
I only tested building lldb-mi on macOS. Here is how I got it working:
- Install llvm and cmake via homebrew
- Checkout the lldb-mi repo
- Build the lldb-mi binary
- Link to a location in my PATH
$ brew install cmake llvm
$ git clone https://github.com/lldb-tools/lldb-mi
$ mkdir -p lldb-mi/build
$ cd lldb-mi/build
$ cmake ..
$ cmake --build .
$ ln -s $PWD/src/lldb-mi /usr/local/bin/lldb-mi
In order to have Emacs find that executable you will need to make sure exec-path is setup correctly at startup. The full dap-mode config looks like this:
(use-package exec-path-from-shell
  :ensure
  :init (exec-path-from-shell-initialize))

(use-package dap-mode
  :ensure
  :config
  (dap-ui-mode)
  (dap-ui-controls-mode 1)

  (require 'dap-lldb)
  (require 'dap-gdb-lldb)
  ;; installs .extension/vscode
  (dap-gdb-lldb-setup)
  (dap-register-debug-template
   "Rust::LLDB Run Configuration"
   (list :type "lldb"
         :request "launch"
         :name "LLDB::Run"
	 :gdbpath "rust-lldb"
         :target nil
         :cwd nil)))
(dap-gdb-lldb-setup) will install a VS Code extension into user-emacs-dir/.extension/vscode/webfreak.debug. One problem I observed was that this installation is not always successful. Should you end up without a “webfreak.debug” directory you might need to delete the vscode/ folder and run (dap-gdb-lldb-setup) again.
I also needed to run sudo DevToolsSecurity --enable once to allow the debugger access to processes.
Additionally I ran into another issue. When starting the debug target I would see:

Even though lldb-mi was on my path and I could start it from within Emacs. It turns out that the error does not come from lldb-mi but from the path to the target you start with. When you start debugging with M-x dap-debug or via dap-hydra d d, after you select Rust::LLDB Run Configuration make sure that the path to the target executable you want to debug is not a relative path and does not containt ~. If it’s an absolute path it should work.
Example that would fail with above error (note the unexpanded ~/):

I needed to specify the full path /Users/robert/projects/rust/emacs/test-project/target/debug/test-project.
Once it is working it should look like that:
In that example I first activate dab-hydra with C-c C-c d. I then select a Rust debug target (that I build using cargo before) with d d. Before I already set a breakpoint with b p. I then step through and into the code with n and i. Note that you can also use the mouse to set breakpoints and step.
Setting up debugging is still not as smooth as it could be but once it is running it is a joy!
Rust playground
You probably have seen the online Rust playground https://play.rust-lang.org/ that quickly allows you to run and share snippets of Rust code. A somewhat similar project for Emacs is grafov/rust-playground which allows you to quickly create (and remove) Rust scratch projects. By default, the rust-playground command will create Rust project directories at ~/.emacs.d/rust-playground/ and open up main.rs with keybindings to quickly run the project (C-c C-c). This is very handy if you want to quicky test a Rust code snippet or tryout a library. All from the comfort of your own editor!
Additional packages
I will not cover it here but there are a number of other emacs packages that will improve the Emacs developing experience for Rust and other languages vastly. Just some pointers:
- projectile: Adds the notion of projects to emacs and a large number of commands that operate on them. E.g. open shell in project, search code in project etc.
- helm, selectrum or ivy: We spend a lot of time selecting one or multiple choices from lists. Be it to open files, switch between buffers or run commands (
M-x). All of these packages make it easier to select options via keyboard input in emacs and allow to filter large lists. helm is my personal daily driver but selectrum is a good alternative and more light-weight. It is used in thestandalone.elversion of the associated gitub project. - shackle: The default emacs window behavior is… not optimal. Shackle allows to define rules matching buffer names. My default rules are in this gist.
- dired Built-in to Emacs. The last file manager you will need.
Thanks to all the package maintainers!
Last but not least a big Thank You! to all the people developing and maintaining the open source software referenced here. The rust-analyzer project is amazing and has improved the state of Rust Emacs tooling considerably. That of course would not be half as useful without lsp-mode and lsp-ui. rustic simplifies a lot of the otherwise necessary configuration around rust-mode and adds very helpful features. Company and flycheck are my defaults for other language modes anyway. And of course also thanks to all the Emacs maintainers and everyone I forgot who had a hand in all this!
-
Racer used to be the best option for getting IDE features (code navigation etc) into Emacs. It is a non-LSP solution which is still faster than RLS and rust-analyzer. However, the number of features especially around code completion are not up to par with rust-analyzer anymore. ↩︎
-
Setting
lsp-inlay-hint-enableglobally totwill also enable inlay hints in other language modes. If you don’t want that, insert(setq-local lsp-inlay-hint-enable t)intork/rustic-mode-hookinstead. ↩︎ -
Emacs has also built-in support for gdb via GUD but needs to control the gdb process directly. DAP is more similar to LSP in that it is used to control a debugging process remotely and makes it easier for editors to integrate with. ↩︎